Manual Win95 System Setup for
USFamily.Net
(You shouldn't be here unless you are
debugging a system that failed to install using the Internet
Wizard).
Dial-up Networking
Installation
TCP/IP
Networking Installation
Dialer Setup
Dialing
USFamily.Net
If you don't get
connected
Part 1: Dial-Up Networking Installation
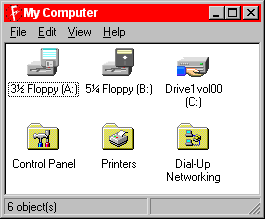
- 1-1. Select (double click) "My Computer"
located at the top left corner of your desktop (unless you moved it somewhere else).
- 1-2. If the "Dial-up Networking" folder
already exists then skip to TCP/IP Networking Installation
because you already have Dial-up Networking installed
- 1-3. Installing Dialup Networking:
- 1-4. Select (double click) the icon called "Control
Panel"
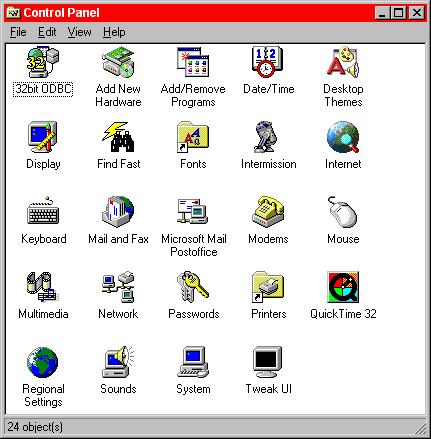
- 1-5. Select (double click) the icon called "Add/Remove
Programs".
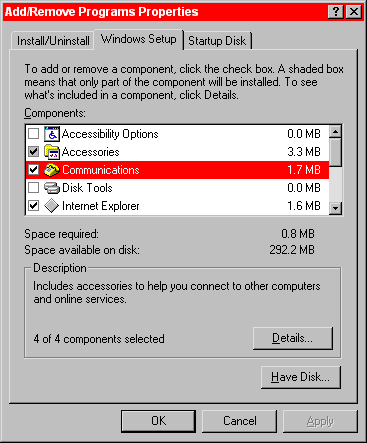
- 1-6. Click the "Windows Setup" tab at the
top of the menu.
- 1-7. Click the "Internet Explorer" line
item if it is not checked.
(If the box is checked but you have no Internet Icon on your desktop try clearing the box,
Click OK to remove it and then restart this process from the top to load it again from
scratch.)
- 1-7a. Select (double click) the "Communications"
line item.
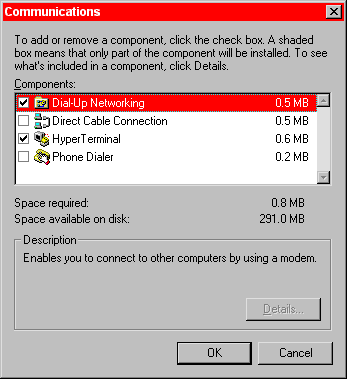
- 1-8. Click the "Dial-Up Networking" item by
clicking the small square box located at the left of the "Dial-Up Networking"
line item.
- 1-9. Click the "OK" button to install.
- 1-10. Every system is different on installation at this
point depending on if you installed from floppies, CD-ROM, or hard disk files. Carefully
follow the instructions prompted to you by Windows 95 Setup.
- 1-11. You are NOT finished with the installation. You
need to configure a few other things before you can dialout.
- 1-12. I highly recommend at this point you go back and
attempt installation using the Internet Wizard unless you have
already tried that a few times.
Part 2. - TCP/IP Networking
Installation for Win95
- 2-1. If "Control Panel" is not on your screen then
Select (double click) the "Control Panel" icon found on the "My
Computer" folder on your desktop.
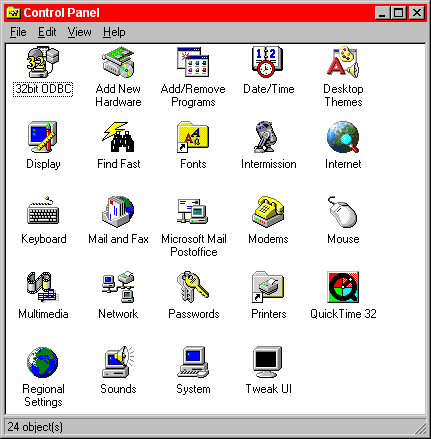
- 2-2. Select (double click) the icon called "Network".
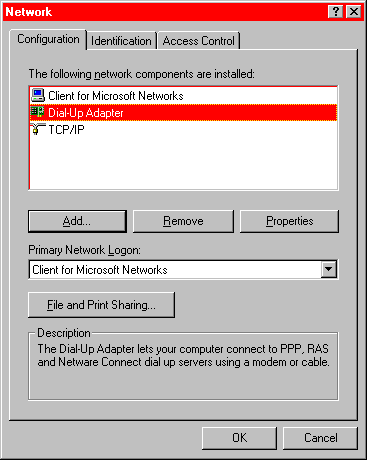
- 2-3. Click the "Dialup Adapter" item,
- 2-4. Click the "Add" button located
mid-screen at the left. (This option will allow us to add the required protocols to
the"Dialup Adapter". )
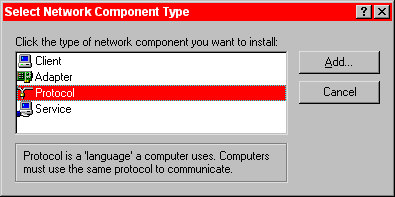
- 2-5. Click the "Protocol" line item and
click the "Add" button. (or you may double click "Protocol").
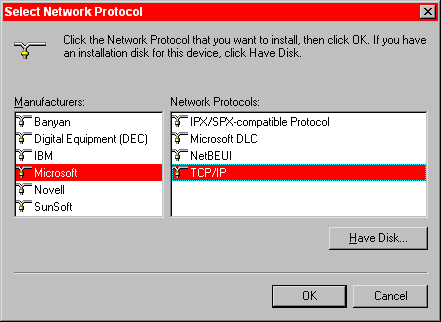
- 2-6. Click the item "Microsoft" on the left
("TCP/IP" should then be listed on the right section).
- 2-7. Click "TCP/IP" on the right.
- 2-8. Click the "OK" button located at the
lower right portion of the menu to begin installation.
- 2-9. Every system is different on installation at this point
depending on if you installed from floppies, CD-ROM, or hard disk files. Carefully follow
the instructions prompted to you by Windows 95 Setup.
- ...
- ...
- 2-10. When the TCP/IP installation is complete return to the
"Network" menu to configure TCP/IP.
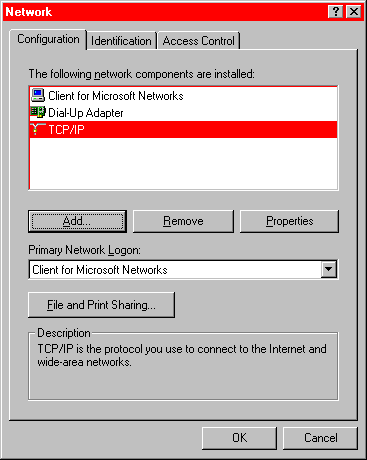
- 2-11. The "TCP/IP" and "TCP/IP
Dial-Up Adapter" line items should now appear under the configuration tab of the
"Network" menu.
- 2-12. Click the "TCP/IP Dial-Up Adapter"
line item then click the "Properties" button, found at the
mid-right-screen.
- 2-13. BE SAFE!!! if you are part of a LAN
(local area network) consult with your system administrator before making any changes to
this menu. Doing so may disable network connectivity for your system. If this is
standalone system just keep going.
- 2-14. Click the IP Address Tab at the top right of the menu
- 2-15. Click "Obtain IP address automatically"
(it is probably already selected).
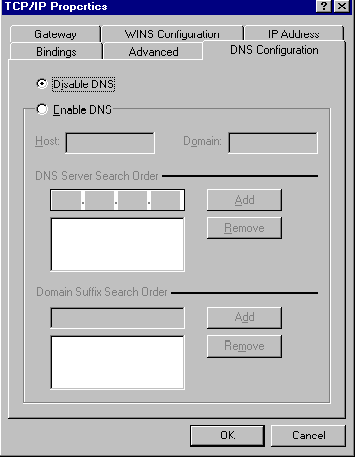
- 2-16. Click the "DNS Configuration" tab at
the top right of the menu.
- 2-17. Click "Disable DNS" (it is probably
already selected).
- 2-18. Click the "Gateway" tab located at
the top left of your menu.
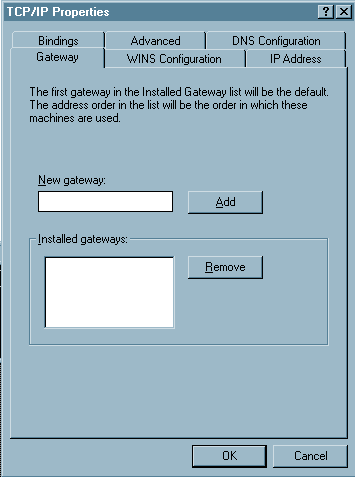
- 2-19. If the "Installed gateways" is not blank,
click each line item and click remove until the installed gateways box is blank.
- 2-20. Leave the Installed gateways blank. The USFamily.Net
Access switches handle this for you.
- 2-21. Click "OK".
- 2-22. At this point you may get prompted to reboot the
system.
- 2-23. Reboot now by following instructions on the screen or
using shut down from the start button.
Part 3: Dialer Setup
- 3-1. Select (double click) the "My Computer" icon
on your desktop.

- 3-2. Select (double click) the "Dial-Up
Networking" icon.
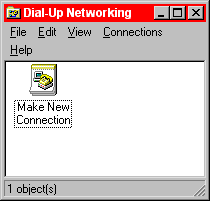
- 3-3. Select (double click) the "Make New Connection"
icon.
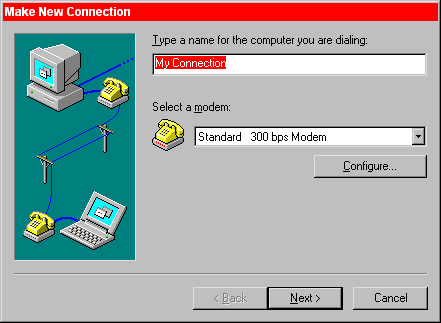
- 3-4. Enter in the name "USFamily.Net" in
the text box for the name of the site you are dialing.
- 3-5. Select the modem you use to dial out from the drop-down
list (click the down arrow to see the list if you have more that one configured).
- 3-6. (If the modem is not listed you will need to
install the modem into "Windows 95". For instructions on installation see
your "Windows 95 Installation" manual regarding "Adding New
Hardware".)
- 3-7. Click "Next" at the bottom of the
screen.
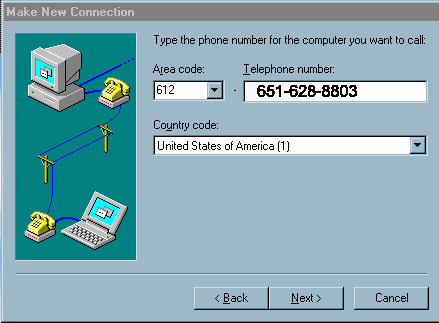
- 3-8. Enter Area code 612
- 3-9. Enter Telephone Number 697-0123
- 3-10. Click "Next" at the bottom of the
screen.
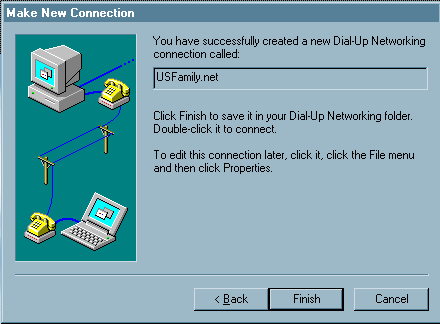
- 3-11. Click "Finish" to complete the dialer
setup.
- 3-12. Now we will have two icons in our "Dial-up
Networking" folder, "Make New Connection" and "USFamily.Net".
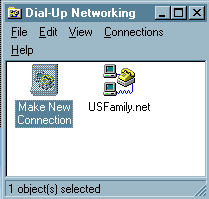
- 3-13. We aren't really finished yet.
- 3-14. Click (only once!! - don't double click) USFamily.Net
- 3-15. Click File from the menu bar at the top of the folder.
- 3-16. Click Properties.
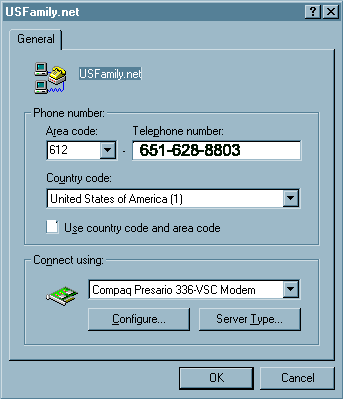
- 3-17. Click Server Type (This could be a tab at the top of
the menu (on newer Win95 releases) or a box toward the bottom right of the menu.
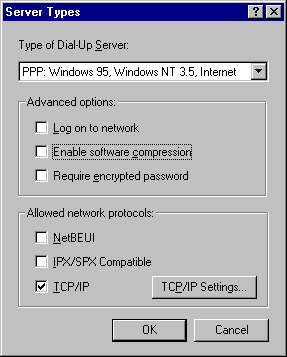
- 3-18. In the server type window, the top list box should
have "Windows 95, Windows NT 3.5, Internet" listed. The only box that
should be Selected is TCP/IP. Once this is done, click on the TCP/IP settings.
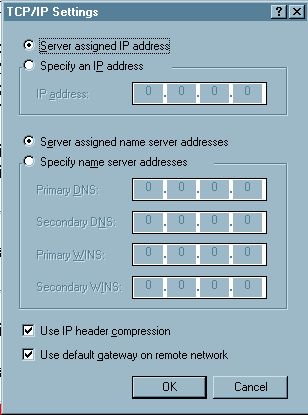
- 3-19. Select "Server Assigned IP Address"
- 3-20. Select "Server Assigned Name server addresses"
- 3-21. Select "Use IP Header compression".
- 3-22. Select "Use default gateway on remote network".
- 3-23. If you were lucky all these were set, but if you were
lucky you would we be using the internet setup wizard.
- 24. Click "OK"
Part 4: Dialing USFamily.Net
- 4-1. We should have two icons in our "Dial-up
Networking" folder and we are ready to dial USFamily.Net for the first time.

- 4-2. Select (double click) the "USFamily.Net"
icon.
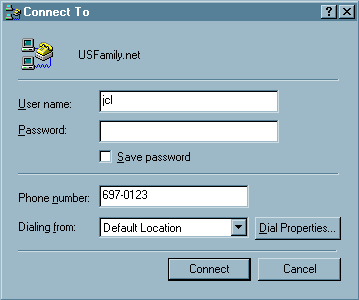
- 4-3. In the "User Name" text box type your
username at USFamily.Net
- 4-4. In the "Password" text box type your
password for your USFamily account. (NOTE:Be sure to match case on your password,
if you do not you will not connect.)
- 4-5. Click the box to the left of "Save password"
item.
- 4-6. Click the "Connect" button .
Welcome to USFamily.Net!
Part 5: If you don't get connected
- 5-1. Repeat the setup carefully.
- 5-2. Call for assistance.
Back to Getting started


