|
Overview:
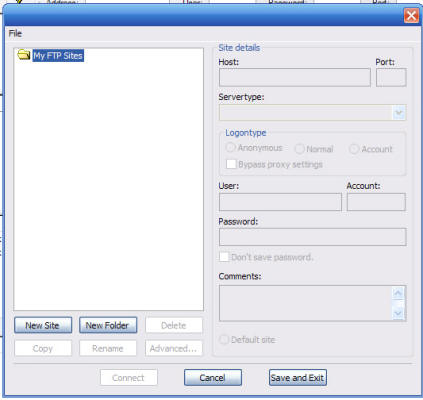
The Site Manager manages a
list of servers so that you can quickly connect to them. It stores
their addresses and their logon information so that you don't have
to remember all server details. FileZilla will do that for you.

(The Site Manager window)
Controls
There are a lot
of controls on this dialog. Each of them is listed below with a
description.
|
Site List |
- |
Lists
all sites that you've entered in the Site Manager and
arranges them in a tree. Click on an entry to see or change
its details. Double click an entry to connect to that site. |
|
Host |
- |
This
is the address of the server. |
|
Port |
- |
The
port at which the server is located. |
|
Servertype |
- |
Here
you can choose the type of the server. Currently 3 server
types are supported:
- FTP - The default protocol of
FileZilla
- FTP over SSL (explicit
encryption) - used to connect through SSL secured
servers, secure channel gets established upon
connection.
- FTP over SSL (implicit
encryption) - used to connect through SSL capable
servers, secure channel gets established before logon.
- SFTP using SSH2 - uses to
connect to an SFTP server using an encrypted connection
|
|
User |
- |
The
username that will be used for the logon on the server. |
|
Password |
- |
The
password that will be used for the logon on the server.
Select Don't save password if you don't want
FileZilla to remember your password for that site. In this
case you will be asked for the password every time you want
to connect to that site. Useful if you're not the only one
who has access to your machine. |
|
Logontype |
- |
Specifies the way in which FileZilla will connect to the
server. If you select anonymous, you can't enter a
username and password. In this case the username always is
anonymous. When you select Normal, you have to enter
a username and if required, a password. When the checkbox "Bypass
proxy / firewall settings" is checked, then FileZilla
bypasses any proxy or firewall settings that you've set in
the options. Checking this could be required if you want to
connect to servers in your LAN. |
Default remote directory,
Default local directory |
- |
When
you connect to a site, FileZilla switches both the local and
the remote directory to the ones you have entered here. |
|
Default site |
- |
When
selected, the site selected in the site list is the default
site. This site will be selected everytime you open the Site
Manager. FileZilla will also connect to this site when you
use "Connect to default Site" from the menu of the main
window. |
|
New Site |
- |
Creates a new entry in the list. Fill out the edit fields on
the right and the new site is ready to use. |
|
New Folder |
- |
Creates a new folder in the tree. Use folders to group your
sites. |
|
Delete |
- |
Deletes the selected entry from the site list after asking
for confirmation. |
|
Connect |
- |
Connects to the selected site and saves any changes. |
|
Cancel |
- |
Discards all changes and closes the Site Manager. |
|
Save and Exit |
- |
Saves
all changes and closes the Site Manager. |
The menu
The Site
Manager has a small menu from which you can import and export the
Site Manager entries.
Your sites can
be exported in two ways: as a simple URL list or with all details.
In both cases you will be asked for the name of the text file into
which your sites will be exported. In the first case, only the full
URL (including port, username, password and remote directory) of the
server gets saved. In the second case, all settings get exported.
When you select
Import from the menu, you will be asked for a filename.
FileZilla automatically detects whether the file contains any sites
and if it is a URL list or a full detail list.
|
